안녕하세요 갈아만든쌀입니다. 신나는 백엔드 개발. 오늘도 날림공사.
1. 준비물
- Spring boot 중 oauth2-client dependancy https://mvnrepository.com/artifact/org.springframework.boot/spring-boot-starter-oauth2-client
- 구글 api 콘솔 중
- application.yml 설정
- SecurityConfig설정
2. Spring boot oauth2-clinet dependancy 추가
https://mvnrepository.com/artifact/org.springframework.boot/spring-boot-starter-oauth2-client
위의 주소로 가서 다운로드 받습니다. 각자 맞는 버전을 해줍니다.
gradle 의 경우
implementation 'org.springframework.boot:spring-boot-starter-oauth2-client'위의 부분입니다. 버전이 없는것은 그 뭐.. 설정되어 있어서 그렇습니다. 디테일은 아래에
plugins {
	id 'org.springframework.boot' version '2.6.1'
	id 'io.spring.dependency-management' version '1.0.11.RELEASE'
	id 'java'
}

group = 'com.loginServer'
version = '0.0.1-SNAPSHOT'
sourceCompatibility = '1.8'

configurations {
	compileOnly {
		extendsFrom annotationProcessor
	}
}

repositories {
	mavenCentral()
}

dependencies {
	implementation 'org.springframework.boot:spring-boot-starter-data-jpa'
	implementation 'org.springframework.boot:spring-boot-starter-mustache'
	implementation 'org.springframework.boot:spring-boot-starter-security'
	implementation 'org.springframework.boot:spring-boot-starter-web'
	implementation 'org.springframework.boot:spring-boot-starter-oauth2-client'

	compileOnly 'org.projectlombok:lombok'
	developmentOnly 'org.springframework.boot:spring-boot-devtools'
	runtimeOnly 'mysql:mysql-connector-java'
	annotationProcessor 'org.projectlombok:lombok'
	testImplementation 'org.springframework.boot:spring-boot-starter-test'
	testImplementation 'org.springframework.security:spring-security-test'
}

test {
	useJUnitPlatform()
}
3. 구글 api 콘솔 설정
https://console.cloud.google.com/apis/
위의 사이트에서 설정 가능하며, 구글에 "구글 api 콘솔"이라고 쳐서 들어가도 됩니다. 확인하시는 시기와 현재 포스팅 시기 UI나 디테일 부분에서 차이가 있을 수 있습니다.
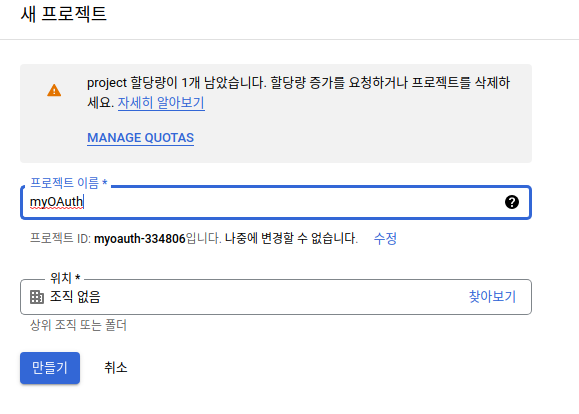
3.1 새프로젝트 생성
상단의 구글 클라우드 플랫폼 옆의 무언가를 눌러 새로운 프로젝트를 만듭니다.

누르면 아래와 같은 창이 뜰텐데 오른쪽위의 새 프로젝트를 누릅니다.

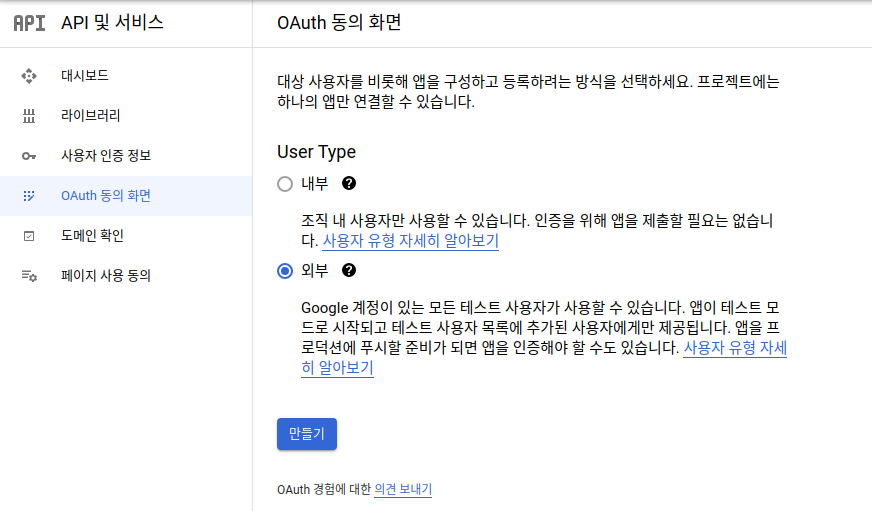
3.2 OAuth 동의화면 만들기
이제 OAuth를 위한 앱을 만듭니다.

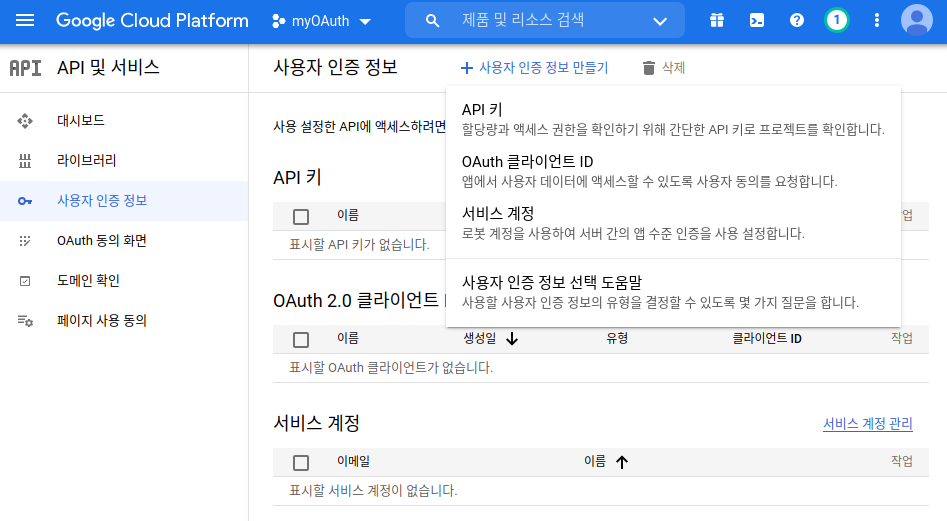
3.3 사용자 인증정보 만들기
앞에서 OAuth동의 화면을 만들었다면, 여기서 사용자 인증정보를 만듭니다.
앱 유형및 이름을 설정합니다. 여기선 springboot를 이용하기 때문에 웹 어플리케이션으로 설정합니다. 그리고 아래 승인된 리디렉션 URI 부분은 본인_로그인_URI/oauth2/code/google 로 해야한다고 합니다. oauth2뒤의 값은 미리 정해져있는 값이라서 그냥 그렇게 하면 된다고 하네요.
좀더 자세히는 위의 주소로 Access토큰을 발급받게 되는데 springboot에서 위의 주소로 받도록 이미 정해져있고, 데이터가 오면 이후 알아서 처리해주는 구조라고 합니다.

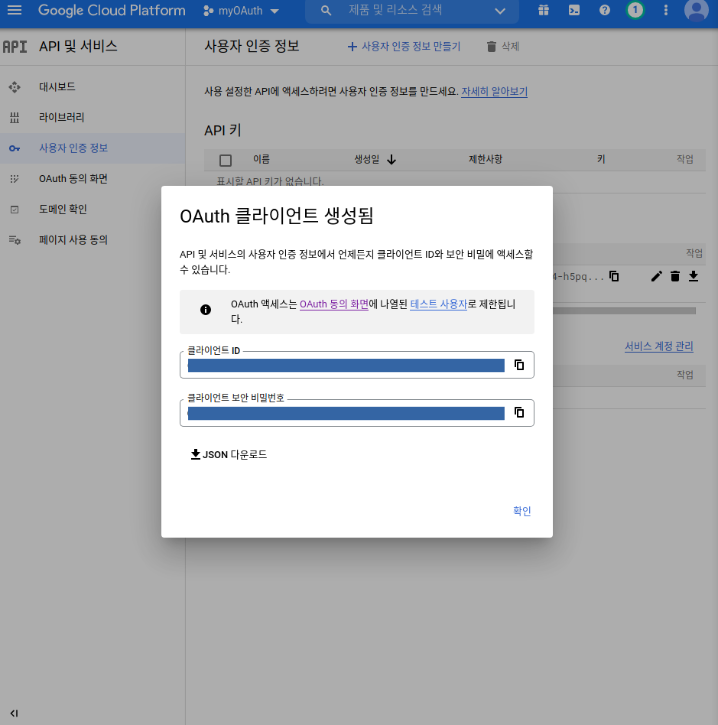
설정끝에 위와같이 생성되는것을 볼 수 있습니다. 이 정보는 따로 저장할 필요는 없고, 사용자 인증정보에서 다운로드 버튼을 누르면 다시 볼 수 있습니다.
4. application.yml 설정
application.yml에 다음과 같은 부분을 추가해줍시다. oauth2를 사용한다는 뜻과, 그 프로파일일 추가하는 내용입니다. 띄어쓰기에 주의합시다
  security:
    oauth2:
      client:
        registration:
          google:
            client-id: 클라이언트 아이디
            client-secret: 클라이언트 비밀번호
            scope:
            - email
            - profile
원래 전체 코드는
server:
  port: 8080
  servlet:
    context-path: /
    encoding:
      charset: UTF-8
      enabled: true
      force: true

spring:
  datasource:
    driver-class-name: com.mysql.cj.jdbc.Driver
    url: jdbc:mysql://localhost:3306/security?serverTimezon=Asia/Seoul
    username: cos
    password: cos1234

  mvc:
    view:
      prefix: /template/
      suffix: .mustache

  jpa:
    hibernate:
      ddl-auto: update #create update none
      naming:
        physical-strategy: org.hibernate.boot.model.naming.PhysicalNamingStrategyStandardImpl
    show-sql: true

  security:
    oauth2:
      client:
        registration:
          google:
            client-id: 클라이언트 id
            client-secret: 클라이언트 비밀번호
            scope:
            - email
            - profile
5. SecurityConfig설정
Oauth2login을 사용한다는 내용과, Oauth2login시 redirection을 설정합니다.
                .oauth2Login()
                .loginPage("/loginForm"); // 구글로그인 창은 띄움
전체코드는 아래에서
package com.loginServer.loginserver.cofig;

import org.springframework.context.annotation.Bean;
import org.springframework.context.annotation.Configuration;
import org.springframework.security.config.annotation.method.configuration.EnableGlobalMethodSecurity;
import org.springframework.security.config.annotation.web.builders.HttpSecurity;
import org.springframework.security.config.annotation.web.configuration.EnableWebSecurity;
import org.springframework.security.config.annotation.web.configuration.WebSecurityConfigurerAdapter;
import org.springframework.security.crypto.bcrypt.BCryptPasswordEncoder;

@Configuration
@EnableWebSecurity
@EnableGlobalMethodSecurity(securedEnabled = true,prePostEnabled = true) //시큐어 어노테이션 활성화, preAuthorization활성화
public class SecurityConfig extends WebSecurityConfigurerAdapter {

    @Bean // Retun object를 IoC등록
    public BCryptPasswordEncoder encodePwd(){
        return new BCryptPasswordEncoder();
    }

    @Override
    protected void configure(HttpSecurity http) throws Exception {
        http.csrf().disable();
        http.authorizeRequests()
                .antMatchers("/user/**").authenticated()
                .antMatchers("/manager/**").access("hasRole('ROLE_ADMIN') or hasRole('ROLE_MANAGER')")
                .antMatchers("/admin/**").access("hasRole('ROLE_ADMIN')")
                .anyRequest().permitAll()
                .and()
                .formLogin()
                .loginPage("/loginForm")
                .loginProcessingUrl("/login") //login 호출시 Security가 대신 진행 -> login at controller불필요
                .defaultSuccessUrl("/")
                .and()
                .oauth2Login()
                .loginPage("/loginForm"); // 구글로그인 창은 띄움
    }
}
여기까지 하면, 로그인 창 자체는 뜹니다. 하지만 login 서버와 연동이 되지 않아서 제대로 작동은 안됩니다. 다음시간엔 구글 로그인시 자동로그인과 facebook로그인 기능도 같이 가져오겠습니다.
https://www.youtube.com/watch?v=9ui2i-SgBpk&ab_channel=%EB%A9%94%ED%83%80%EC%BD%94%EB%94%A9
'아카이브 > 프로그래밍' 카테고리의 다른 글
| [서버관리 / Linux] 서버 용량 관리하기 (0) | 2022.03.08 |
|---|---|
| [알고리즘 / 초급] merge sort 중 merge 응용 (1) | 2021.12.15 |
| [알고리즘 / 초급] Binary Search Insert (0) | 2021.12.10 |
| [SCSS / CSS] Scss실행하기 (1) | 2021.11.17 |
| [Bootstrap / npm] 배포 자동화를 위한 npm 스크립트 작성 (0) | 2021.11.16 |
![[서버관리 / Linux] 서버 용량 관리하기](http://i1.daumcdn.net/thumb/C176x120.fwebp.q85/?fname=https%3A%2F%2Fblog.kakaocdn.net%2Fdna%2Fdljhqw%2FbtrvqbR1r9n%2FAAAAAAAAAAAAAAAAAAAAAMshbcZ3IsTuhCfAkLkClwTHab5BpToarysdBEOaXxSP%2Fimg.png%3Fcredential%3DyqXZFxpELC7KVnFOS48ylbz2pIh7yKj8%26expires%3D1774969199%26allow_ip%3D%26allow_referer%3D%26signature%3DLtKIj9Ncwi8%252F4nRop5R9jN2N%252Frc%253D)
![[알고리즘 / 초급] merge sort 중 merge 응용](http://i1.daumcdn.net/thumb/C176x120.fwebp.q85/?fname=https%3A%2F%2Fblog.kakaocdn.net%2Fdna%2Fb5ZmfT%2FbtrnR5ypFFb%2FAAAAAAAAAAAAAAAAAAAAABRWZjfR2aCcurIo5cBpY_SIJ-FVjXukUONQUD6MB8tg%2Fimg.png%3Fcredential%3DyqXZFxpELC7KVnFOS48ylbz2pIh7yKj8%26expires%3D1774969199%26allow_ip%3D%26allow_referer%3D%26signature%3DJcRDpjF6OjuLhqzuY9irlbVX4xA%253D)
![[알고리즘 / 초급] Binary Search Insert](http://i1.daumcdn.net/thumb/C176x120.fwebp.q85/?fname=https%3A%2F%2Fblog.kakaocdn.net%2Fdna%2F8Al8Y%2FbtrnBaGPHJB%2FAAAAAAAAAAAAAAAAAAAAADE-aoFeDtJZNspUMtGoFp1T9lL57HQWMPldojoZPIEJ%2Fimg.png%3Fcredential%3DyqXZFxpELC7KVnFOS48ylbz2pIh7yKj8%26expires%3D1774969199%26allow_ip%3D%26allow_referer%3D%26signature%3Dm3o7aXS32vC6Xpg3r7YKoe18Kps%253D)
![[SCSS / CSS] Scss실행하기](http://i1.daumcdn.net/thumb/C176x120.fwebp.q85/?fname=https%3A%2F%2Fblog.kakaocdn.net%2Fdna%2FcFSMES%2FbtrkJ674tls%2FAAAAAAAAAAAAAAAAAAAAAN7-8wB-ZwrvjMmaME9PCnzTtidnyxKqVvCXyNVdGVvS%2Fimg.png%3Fcredential%3DyqXZFxpELC7KVnFOS48ylbz2pIh7yKj8%26expires%3D1774969199%26allow_ip%3D%26allow_referer%3D%26signature%3DbKhb6Xr9lbmr0iJYJU3DGzR9r0s%253D)